ChatGPT
 Claude
 Perplexity
 Google AI
In this article
- In short
- Step 1: what do you need before connecting WooCommerce?
- Step 2: where do you start the connection in Fluenceur?
- Step 3: how do you check that your store can be connected?
- Step 4: how do you approve Fluenceur's access on your store?
- Step 5: how do you install the Fluenceur plugin in WordPress?
- Step 6: how do you know everything works?
- What does the WooCommerce connection unlock?
- How do you disconnect WooCommerce cleanly?
- Frequently asked questions
- Key takeaways
To connect your WooCommerce store to Fluenceur, open Settings, Integrations, enter your store address, approve access on your own WordPress site, then install the Fluenceur plugin. No developer needed, and you never copy a key: WooCommerce sends it to Fluenceur.
Step 1: what do you need before connecting WooCommerce?
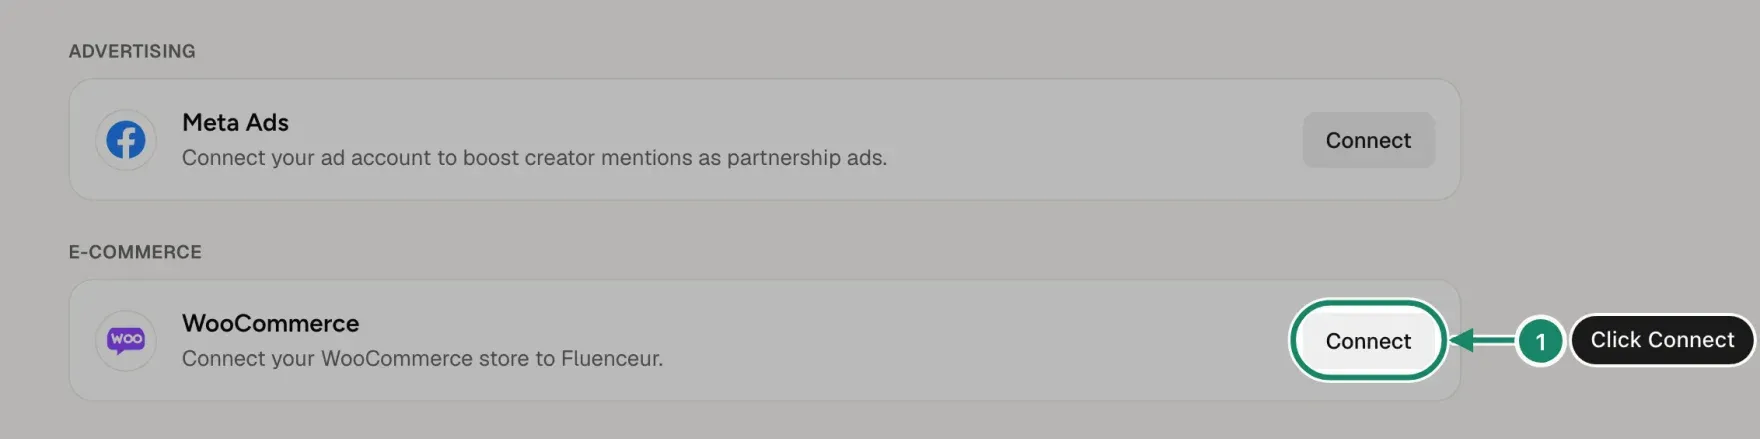
A store served over HTTPS that sells in euros, WooCommerce 9.0 or later, a WordPress administrator account, and a REST API that nothing blocks.
- HTTPS: otherwise, install an SSL certificate; your host often offers one for free.
- Euros (EUR): the store currency is set in WooCommerce, Settings, General, Currency.
- WooCommerce 9.0 or later: the version shows under Plugins. The Fluenceur plugin requires it.
- WordPress administrator: WooCommerce only grants access to a logged-in administrator.
- Reachable REST API: a firewall, a security plugin or your host can block your site's /wp-json/ address.
Nothing to test yourself: at connection, Fluenceur checks each point, names what is missing and says how to fix it.
Step 2: where do you start the connection in Fluenceur?
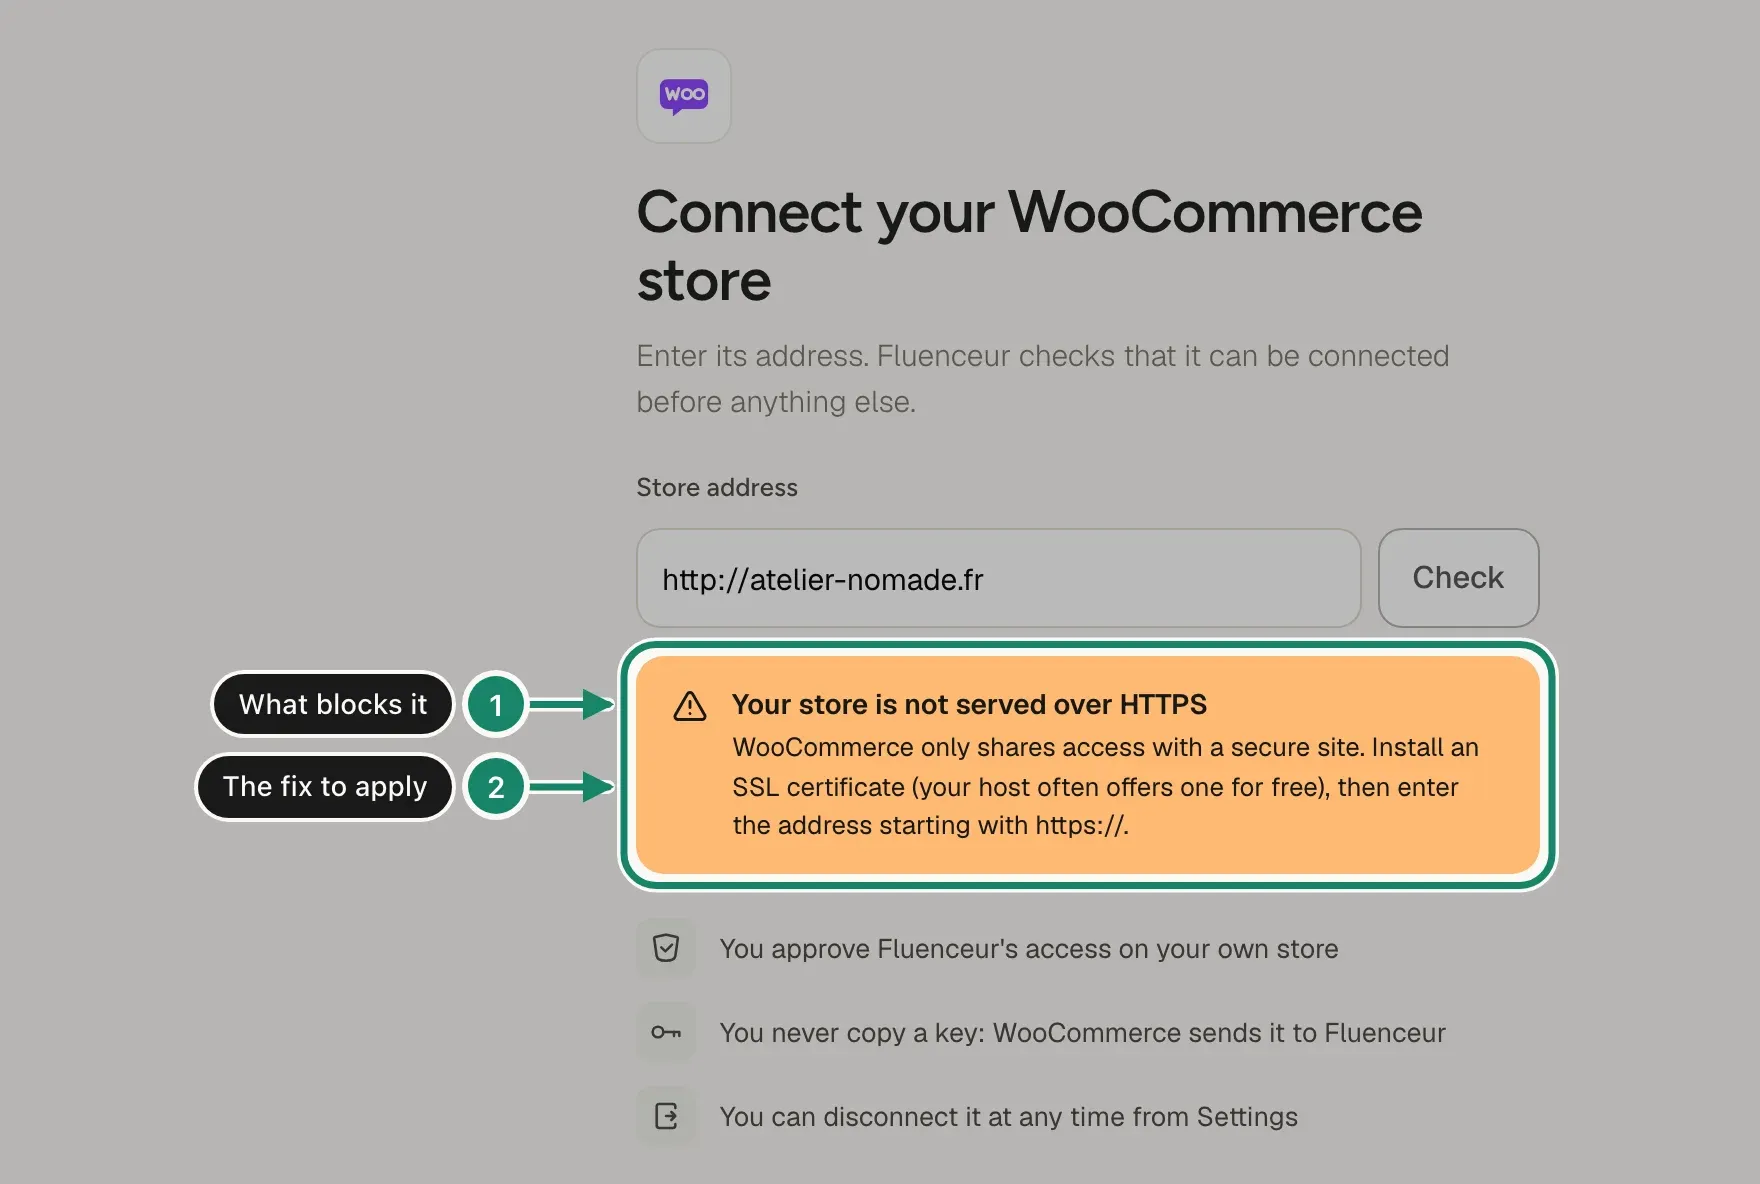
In Settings, Integrations, under E-Commerce: the WooCommerce card carries a Connect button that opens the "Connect your WooCommerce store" window. When you create your account, onboarding offers the same path at "Where do you sell your products?": choose WooCommerce, or connect the store later from Settings, Integrations.
Step 3: how do you check that your store can be connected?
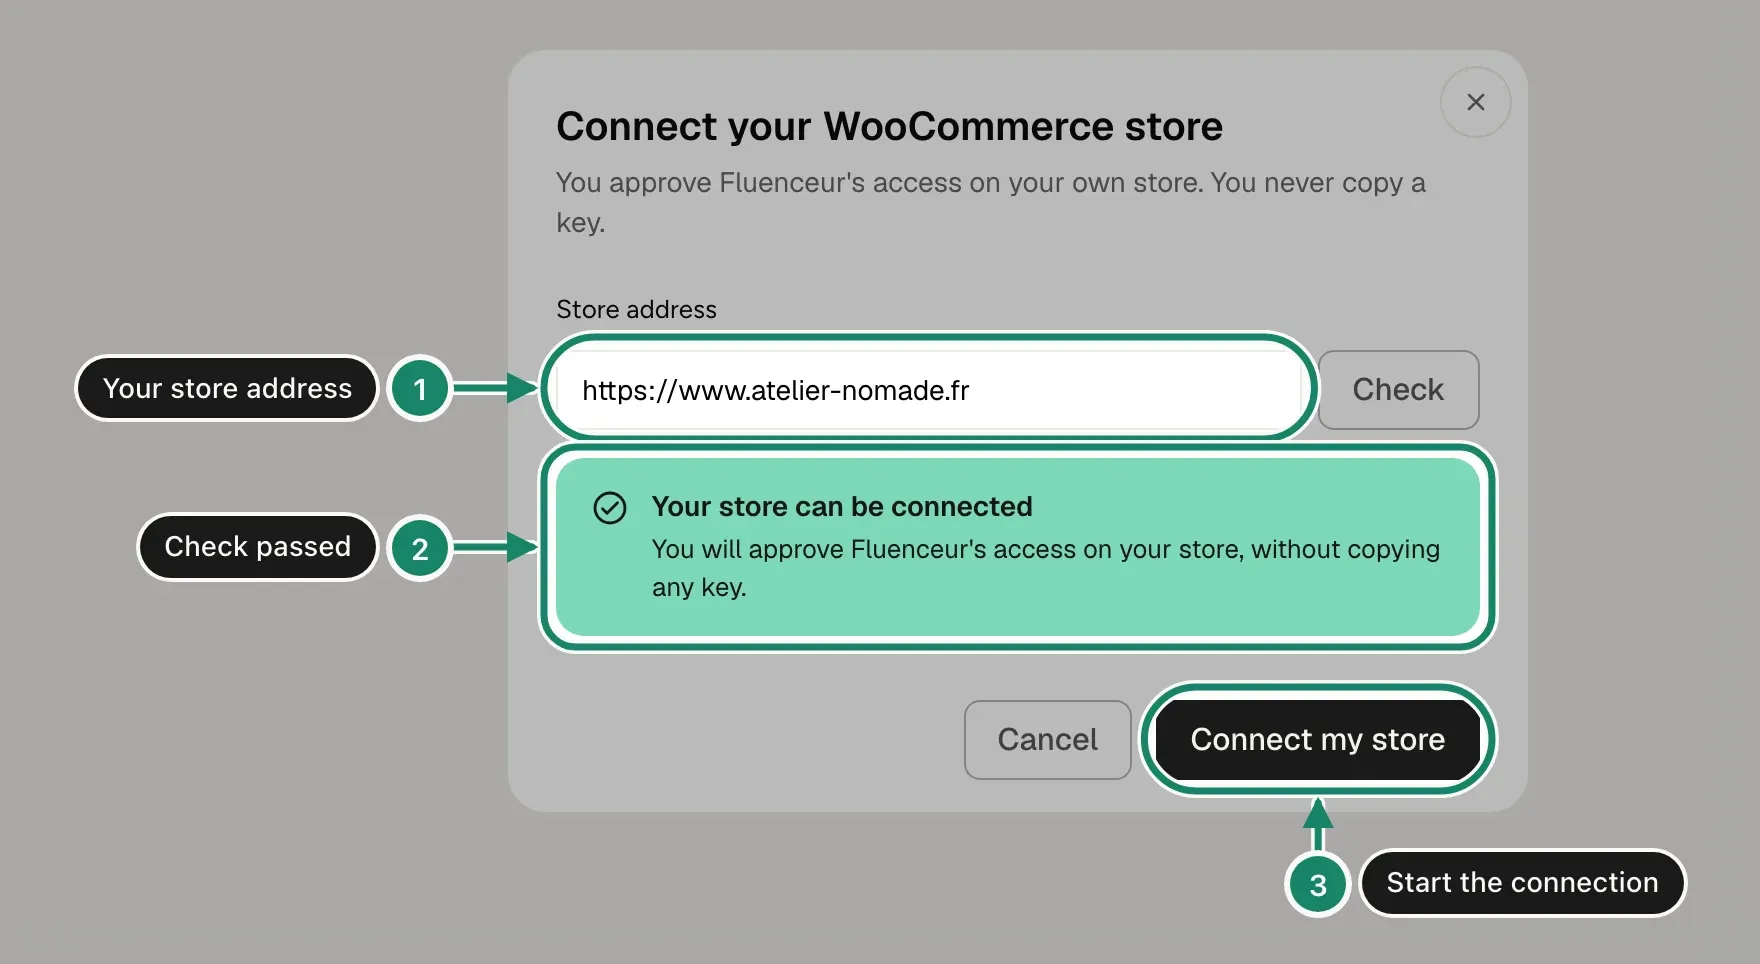
Enter the address in the "Store address" field, for example https://www.atelier-nomade.fr, then click Check. When the "Your store can be connected" banner shows, click Connect my store: Fluenceur sends you to your WordPress site.
Step 4: how do you approve Fluenceur's access on your store?
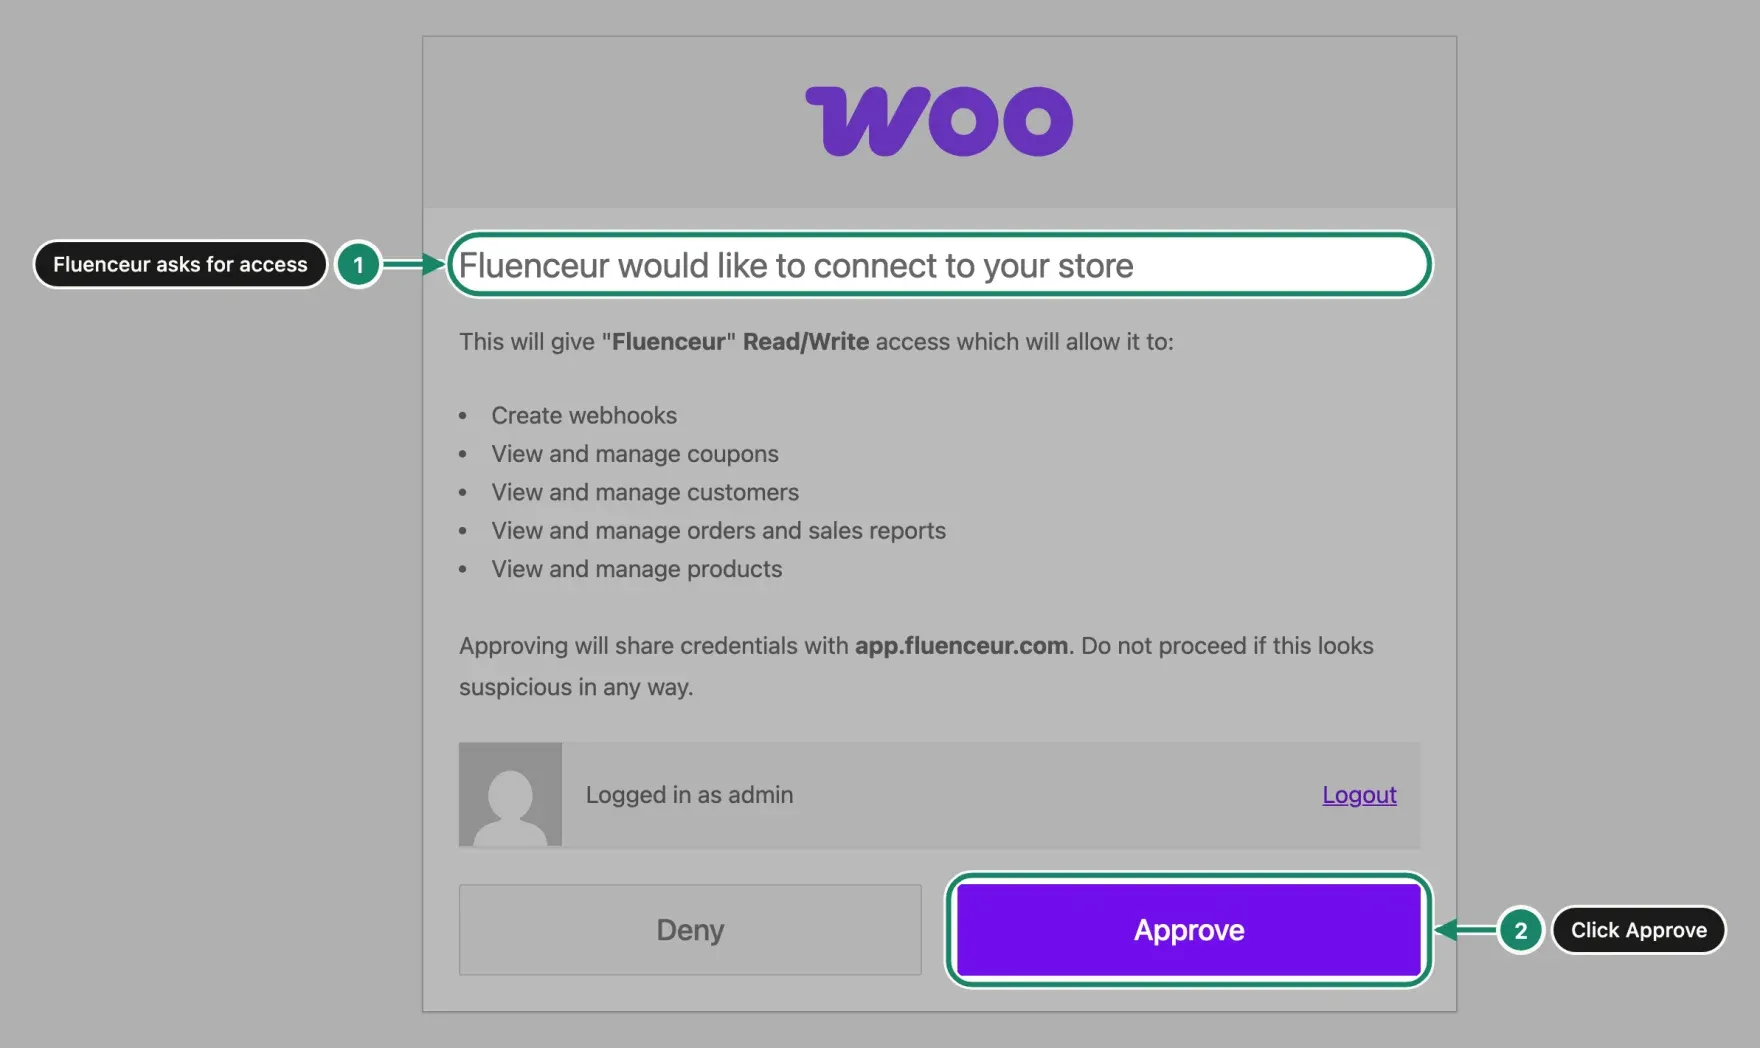
On the WooCommerce approval page, shown on your own site, click Approve. It names Fluenceur and requests Read/Write access, which Fluenceur uses to read your orders and catalog, and to create your affiliates' promo codes and your gift orders.
As soon as you approve, WooCommerce creates a key and sends it straight to Fluenceur, never through your browser. Fluenceur confirms: "Your WooCommerce store is connected." From onboarding, the screen reads "WooCommerce is connected". If you clicked Deny, Fluenceur shows "Nothing was connected" and you can try again.
Step 5: how do you install the Fluenceur plugin in WordPress?
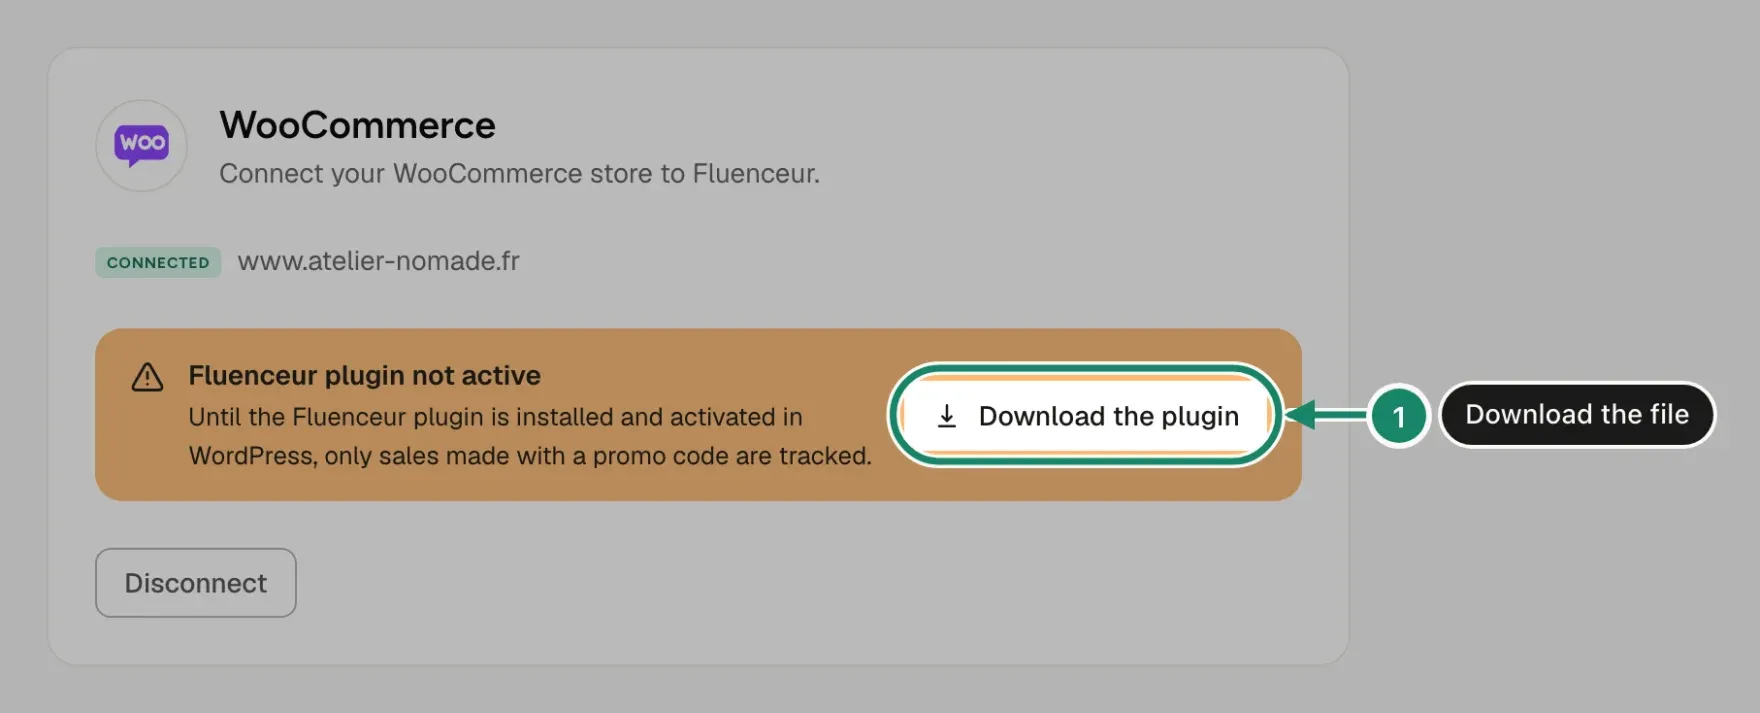
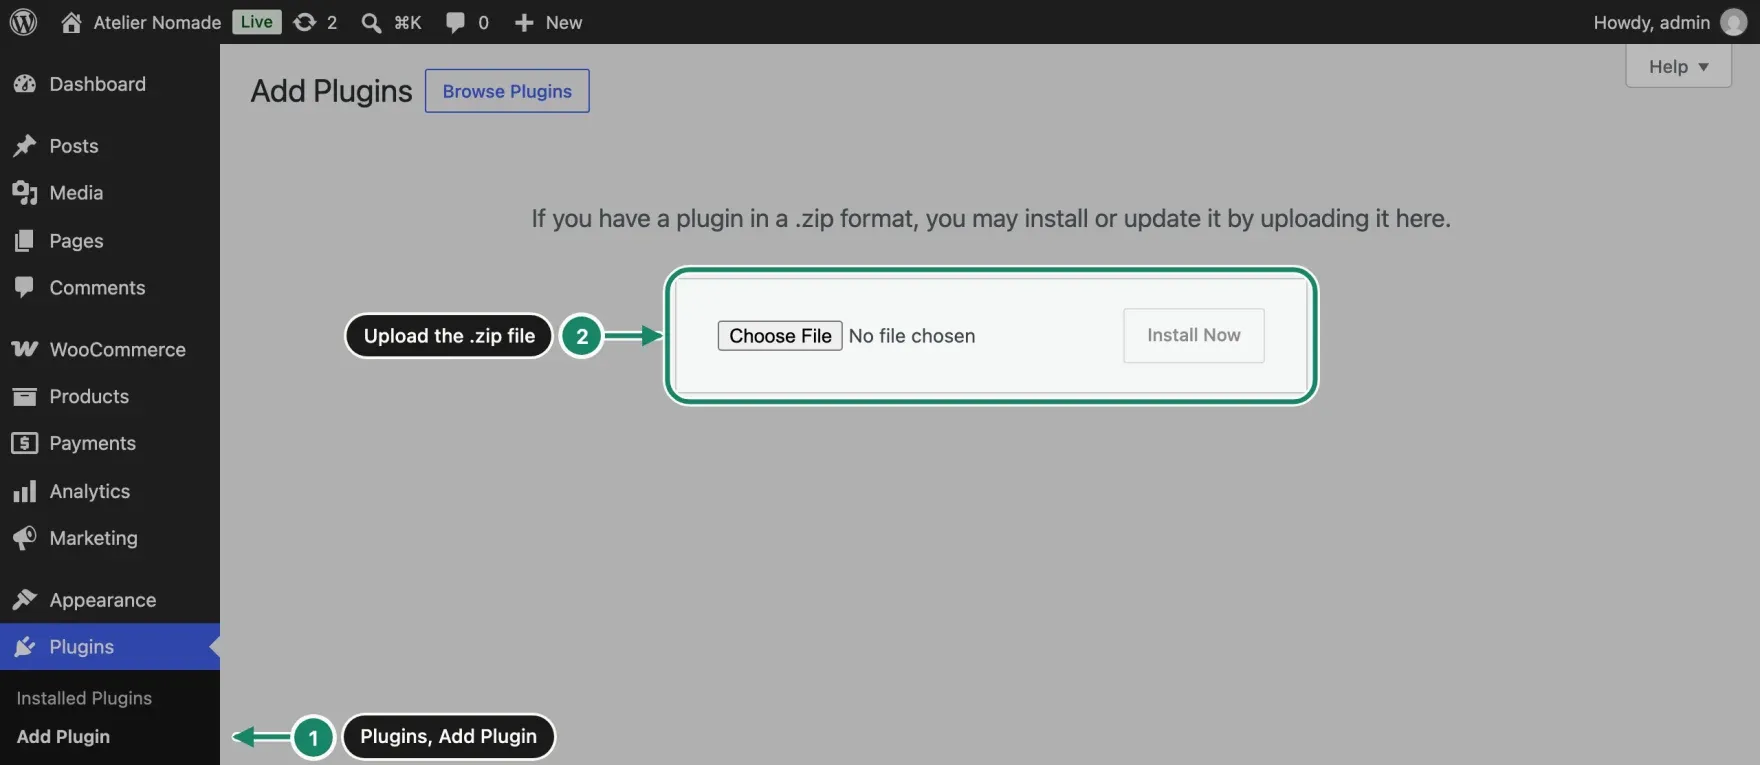
Download it from Fluenceur, then upload it to WordPress. Until the plugin is detected, the WooCommerce card in Settings shows "Fluenceur plugin not active" and a Download the plugin button. Then, in WordPress:
- Open Plugins, Add Plugin, then click Upload Plugin.
- Click Choose File, pick the downloaded .zip file, then click Install Now.
- Click Activate Plugin. No settings to enter.
The plugin follows a visitor who arrives through an affiliate's link all the way to the order and applies that affiliate's promo code; without it, Fluenceur only sees sales made with a promo code. The status can take up to an hour to turn green in Fluenceur.
Step 6: how do you know everything works?
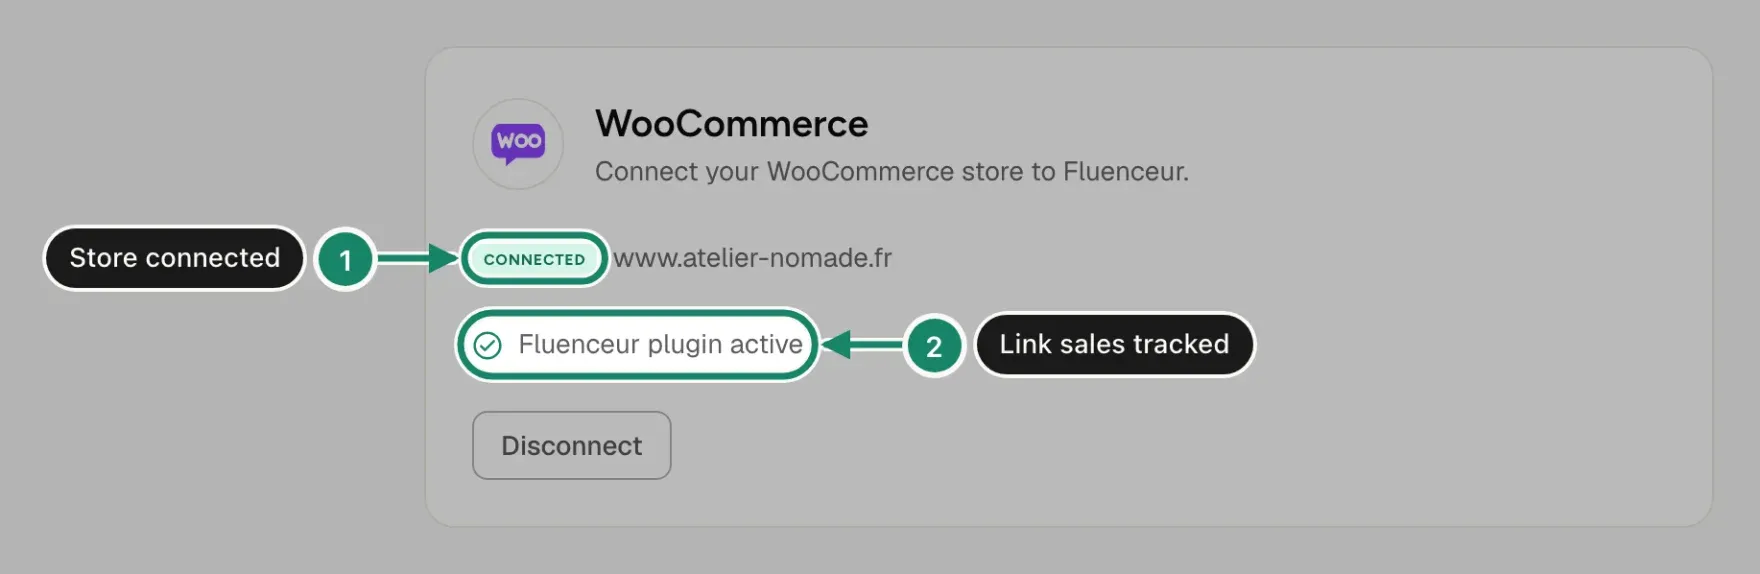
Everything is in place when the WooCommerce card, in Settings, Integrations, shows the green "Connected" badge and, right below it, "Fluenceur plugin active" with a green check. Three other states exist:
- "Fluenceur plugin not active": the store is connected, but the plugin is not detected. Check that it is activated in WordPress, and give the status up to an hour.
- "To reconnect": the key was revoked, or the WordPress user who approved it was deleted or lost their rights. Click Reconnect: the "Reconnect your WooCommerce store" window opens with the address already filled in, and you pick up at step 3.
- "Your store has not answered since", followed by a date: check that the site is online and that nothing blocks its WooCommerce API.
What does the WooCommerce connection unlock?
The WooCommerce connection ties your creators to your sales, with no export and no retyping: your catalog feeds Gifting, Flows and the product picker, and Fluenceur reads and writes in your store for you.
| What happens | What Fluenceur does in WooCommerce |
|---|---|
| An affiliate joins your program | Creates their promo code as a coupon, never overwriting one of yours |
| Their discount changes | Updates their coupon |
| They leave the program, or the program ends | Deactivates their coupon |
| A customer arrives through their link and orders | Follows them to the order and applies the code (with the plugin) |
| An order is paid | Counts it as a sale, attributed to the right creator |
| An order is refunded or canceled | Deducts the commission |
| You send a product through Gifting | Creates a zero-value order with free shipping, never counted as a sale |
To read sales creator by creator, see Measuring creator sales: link, code or tag?.
How do you disconnect WooCommerce cleanly?
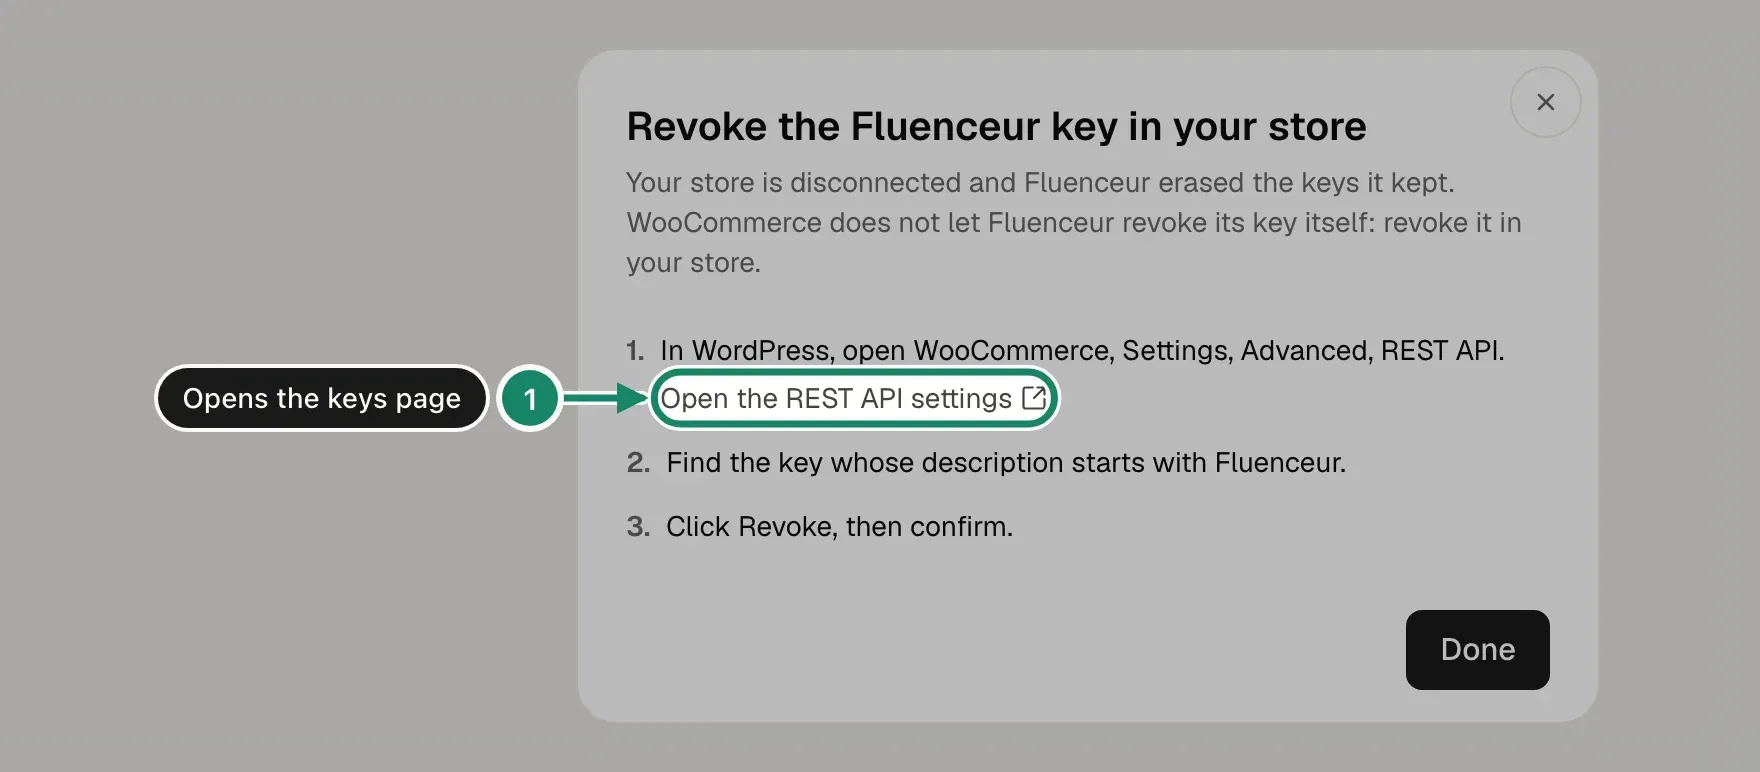
In three moves: Disconnect in Fluenceur, revoke the key in WooCommerce, delete the creator codes still active.
- In Fluenceur, on the WooCommerce card, click Disconnect and confirm "Disconnect WooCommerce?".
- In WordPress, open WooCommerce, Settings, Advanced, REST API, find the key whose description starts with Fluenceur, click Revoke, then confirm.
- In WooCommerce, Marketing, Coupons, delete the promo codes created for your creators yourself: they stay active after the disconnection.
Frequently asked questions
My brand already sells on Shopify. Can I move to WooCommerce?
Yes, with the Fluenceur team: the WooCommerce card says so ("Moving to WooCommerce is done with our team.") and its "Write to us." link opens an email to the team. Once the move is prepared, you follow the six steps above.
My host blocks the REST API. What do I do?
Fluenceur flags the block with the message "The WooCommerce API cannot be reached": ask your host to allow access to /wp-json/, or look for the setting in your security plugin, some offer to disable the REST API. Once the block is lifted, click Check again.
Key takeaways
- Six steps: prerequisites, Settings then Integrations, Check, Approve on your site, plugin, green badge.
- No key to copy: WooCommerce sends it to Fluenceur, and you revoke it whenever you want.
- Without the Fluenceur plugin, only sales made with a promo code are tracked.
Was this helpful?